We’re going to back up a little to something that’s an essential skill to have in engine machining or any kind of machining for that matter.
You MUST know how to operate and read and care for a micrometer. It sounds, elementary, I know, but sometimes it pays to go back to the basics for a quick review. For the sake of this article, I’ll be talking about an inch micrometer. Most people think of an outside micrometer when they hear the term “micrometer”. An “outside micrometer” is one that measures the outside of something such as diameter, length, thickness.
But there are other types of micrometers, including depth micrometers and inside micrometers. As the names imply, they measure depth and the inside diameters, respectively. Often other tools (such as bore gauges) are used with micrometers to determine sizes so knowing how to read the micrometer is absolutely necessary.
How to Read a Micrometer
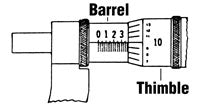 A micrometer is a measuring gauge operated by a screw with 40 threads per inch. This means that one complete revolution of the screw advances one thread or one-fortieth of an inch. 1/40” equals 25 thousandths of an inch or 0.025″ (40 x .025″ = 1″). The beveled edge of the thimble is divided into 25 equal parts. Each line equals 1/25 of .025” or .001” (one thousandth of an inch). One complete revolution of the thimble therefore equals .025” or one line on the barrel scale. With that in mind, here’s a quick quiz: What is the reading shown in the picture to the right? For a larger version of the image, click on the picture. A new window will open with an enlarged view.
How do you think you did? Did you come up with .385”? If not, look at the drawing again. Each of the lines on the barrel represents .025 of an inch. Each of the longer lines (the ones with the numbers above them) equals .1” (4 x .025”). So, we’re showing 3 full lines (.300) and 3 of the small lines (.075). We’re up to .375”. The last .010 is indicated by the reading on the thimble. Add that to the .375” and you have a reading of .385”. Sounds a little confusing I know, but trust me, you’ll get the hang of it the more you do it. Heck, even my wife can read a micrometer now and I still can’t boil water.
|
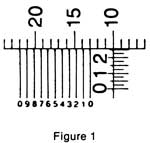
If you need more precise measurements, which is quite common in machining, you can achieve readings in ten-thousandths of an inch by using a Vernier scale (optional on some micrometers). The vernier scale, marked on the barrel, has ten divisions, each equaling 1/10 of 1/10,000”. The difference between a thimble division and a vernier division is 1/10,000 of an inch. Therefore, when the zero lines of the vernier exactly coincide with thimble lines (Figure 1), the number on the vernier lines is the difference between the vernier line and the next thimble line in ten-thousandths of an inch. Thus when the fifth line on the vernier coincides with a thimble line, the thimble has moved 5/10,000 of an inch.
Example:
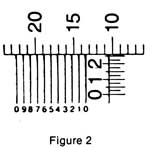
First determine the number of thousandths, as with an ordinary micrometer. Then find a line on the vernier that exactly coincides with a thimble line. By adding the vernier reading to the thousandths reading the actual reading in ten-thousandths of an inch is obtained. The reading shown in Figure 2 is .260 plus .0005 or .2605.
Hopefully, you haven’t run screaming after all of that. It sounds confusing, but take your time and keep at it. It will make sense. For an excellent explanation and demonstration on reading micrometers, I recommend the DVD from Spokane Community College, “How to Use a Micrometer.” It’s 34 minutes long and explains the micrometer use in easy to understand terms with live action examples.
Cleaning contact surfaces
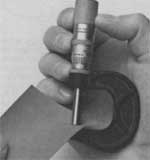 Keeping the contact surfaces of your micrometer clean is important. When you’re measuring in such small increments, a speck of dust can throw off your reading which can affect your overall engine build. I recommend cleaning the contact surfaces every time you get the micrometer out to use. It may seem like overkill, but it will save you time and money in the long run.
You don’t need any fancy tools to clean the contact surfaces. A quick and easy method is to close the micrometer lightly on a piece of soft paper. Then pull it out. The paper will probably leave fuzz and lint on the surfaces. For larger micrometers, use a clean, non-abrasive shop towel. Blow this out with lung power – not the air hose. Never use compressed air to clean any precision instrument. The high velocity air forces abrasive particles into the mechanism as well as away from it.
Calibrating your micrometer
Outside micrometers need to be checked for calibration regularly to compensate for any wear of physical damage. It is a fairly easy procedure, but must be done carefully or you could make things worse. For best results, we recommend that adjustments in tension and setting be made for wear only.
As we said before, even the tiniest speck of dust can change the reading on a micrometer so, make sure that measuring surfaces are clean; secondly, be equally positive that the standard of comparison is correct. Micrometer checking gauge blocks and optical parallels are available on the market primarily for checking a micrometer for lead error and parallelism. Be sure that both the micrometer and the calibration standard you’re using are at room temperature. As you know, temperature differences can affect readings dramatically.
To adjust the calibration of your micrometer, close the micrometer to feel. Engage the lock ring to ensure that it doesn’t move while you’re working on it. Hold the knurled thimble firmly with the thumb and forefingers of one hand. With the surfaces in contact, insert the spanner wrench (included with the micrometer) into the hole drilled in the micrometer sleeve. Hold the spanner between the thumb and forefinger of your other hand with your thumb resting against the sleeve. Now rotate the amount necessary to make the needed correction. Test the adjustment with the micrometer set at zero being sure that no oil or dust is present on the anvil or spindle. Before leaving the factory Goodson’s micrometers are carefully adjusted and rigidly inspected, comparison being made with the most accurate gauges obtainable, assuring all micrometers of meeting all requirements outlined in Federal Specifications.
Caring for your micrometer
One of the things that really got my blood boiling when I taught at the tech school was seeing a student not taking care of his or her measuring tools properly. Here are a few tips on the right way to take care of your micrometer.
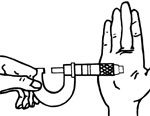 When you’re preparing to measure a part, bring the micrometer to nearly the desired opening. Do this by rolling the thimble along your hand or arm – not by twirling. When placing the micrometer on to the reference plane of the part, hold it firmly in place with one hand. Use the feel of stability (no rock) to show then the axis of the micrometer is perpendicular to the reference plane. Rapidly close the micrometer using the ratchet until the spindle is nearly on the measured plane of the part. This usually can be determined visually. If you hit the part before expected, back off slightly and then slowly and gently close the spindle until the ratchet stop disengages one click.
Note that the procedure requires two hands. If the micrometer is handled with only one hand, the ratchet stop cannot be reached, and reliability will suffer. It works out fine for any part that is large enough to support itself without moving around during measurement. It can be awkward for small parts.
Some people purchase micrometers without ratchet stops. Don’t be one of them. The micrometer is a contact instrument. That means that there must be positive contact between the part and the instrument. And the amount of contact (all-important feel) is up to the user. When you are attempting to measure one-mil (0.001 inch.) reliability – the same true reading time after time – almost imperceptible differences in gauging force can be very important. Because human beings vary so widely this is a source of serious errors in measurement.
Always store your micrometer in its case in a secure place when you’re not using it. This will help to keep dust and other particles out of it and you’ll always know where it is when you need it. And one last reminder – A MICROMETER IS NOT A CLAMP. Don’t use it like one or you’ll hear from me.
As always, if you have more questions or need advice, call the tech services department at Goodson at 1-800-533-8010.
