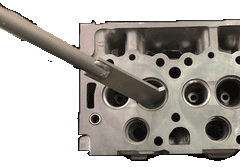
If you’ve been working on cylinder heads for any time at all, you’ve had to remove a valve seat insert or two, so you know it’s not an easy job. Those suckers are in there tight – and they’re supposed to be – but that makes it tough to get them out when you need to. There are a few ways to get the inserts out, which I’ll touch on briefly, but one of the newest and fastest ways is to use your 3-D Fast Cut™ System (or other 3-angle cutting system) to cut the inserts out without damaging the counterbore.
Why remove the original inserts?
Over the years that I’ve been working on engines, I’ve run into four fairly common reasons for replacing original seat inserts.
- They’re already loose.
- They’re worn or damaged.
- The head is cracked and the insert will be compromised when repairing the crack.
- The seat has been machined to the point that proper specifications can’t be achieved.
I could write a whole piece on the last reason, but that’s for another time.
Insert removal options
Now that you’ve decided that you have to replace the inserts, it’s time to get them out. As I said before, there are a few ways you can do this depending on the head material, how much time you have and the tools at your disposal. Naturally, you want to do this without damaging the counterbore or you’ll have even more machining ahead of you.
One of the most common methods you’ve probably used, or have at least heard about, is welding. Now there are a couple of ways you can go at it. First, you can weld a scrap valve to the insert to use as a driver. Be sure you pick out a valve that’s slightly smaller than the insert or you’ll be creating more problems for yourself. The second method involves welding a bead inside of the insert. As the weld cools, the insert should shrink and you can then pry it out. This will work with a cast iron head, but with aluminum heads or with powdered metal seat inserts, welding is not an option.
So now what? If you’re working on cast iron heads, there are removers that work by prying out the inserts. The down side for these pullers is that they often won’t fit into small engines and they can damage the casting below the insert. Again, if you’re working on aluminum heads, they won’t work and you’re back to square one.
 The newest method for removing seat inserts has been developed in the last few years to use the 3-angle cutting system that’s becoming more common in shops. The Goodson brand is called 3-D Fast Cut™ but this method will work with virtually any popular 3-angle system. Basically what you’re doing is relieving the press fit for quick and easy removal.
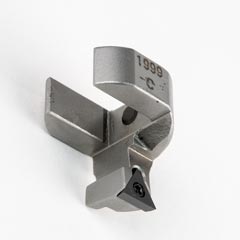
If you’re using the 3-D Fast Cut (or other 3-angle system) you have most of the tooling you need in your shop already. The only new parts you’ll need include the Tip Holders and cutting tips.
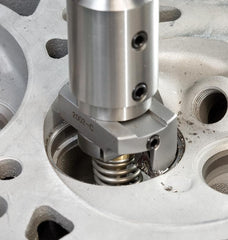
Step One – Set up your cutter for the first cut
You’ll want to make two or three cuts for Nickel-Chrome for hard alloy inserts. If you’re removing LP or hardened seats, you’ll do best with three or four cuts so you’ll need to set your cutter to remove one-third to one-quarter of the insert thickness instead of one-half.


Examples of what can happen to the tool holder when you try to cut the insert out in a single pass.
I can’t stress this enough. DO NOT TRY TO CUT THE INSERT OUT IN A SINGLE PASS. A single pass will put far too much pressure on the tip and could result in damage to the holder and the cylinder head.
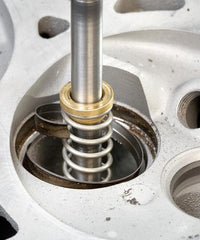
 Step Two – Set up your cutter for the second (and third) cut
Again, set up the cutter to remove the remainder of the insert, except for .010″ to .015″ of the remaining thickness. You want to leave this as a buffer so that you won’t damage the bore. You should also work slowly and carefully to minimize damage to the bore.
 Step Three – Extract the remaining insert material
You have two options here. You can either use a seal pick to pop out what’s left of the insert or you can make a third cut that’s just deep enough to break through the insert material. Again, be extremely careful not to damage the casting.
As always, for more information, you can call one of the Goodson Techxperts™ at 1-800-533-8010.